You open the box, see the sparkle, and dive in. But those tiny drills? They’ve been through a lot before landing in your tray. Diamond Painting Kits are built with precision, mapped by software, packed by machines, and assembled with care. From resin molding to adhesive layering, every part is engineered for shine and accuracy. Once you know the process, the craft feels different. You’re not just placing drills, you’re finishing what a global production line started.
What Are Diamond Painting Kits Made Of?
At first glance, Diamond Painting Kits seem simple. But once you open one, you realize it’s a carefully engineered mix of materials designed to work together. And if any part is off even slightly, the whole experience suffers. Here’s what’s inside:
- Adhesive Canvas | This is the base layer. It’s printed with a grid of symbols and coated with pressure-sensitive adhesive. If the canvas is poorly made, the drills won’t stick well or may shift over time. The best ones use UV-stable ink and smooth glue layering for long-term hold.
- Resin Drills (Diamonds) | These tiny beads are faceted to reflect light. High-quality drills are uniform in shape and color. Low-quality ones? You’ll notice flat edges, dull finish, and inconsistent sizing. It throws off the whole look.
- Color-Coded Chart | Also called a legend, this chart maps each symbol to a drill color. Kits that use DMC coding are easier to follow and more accurate when replacing missing drills.
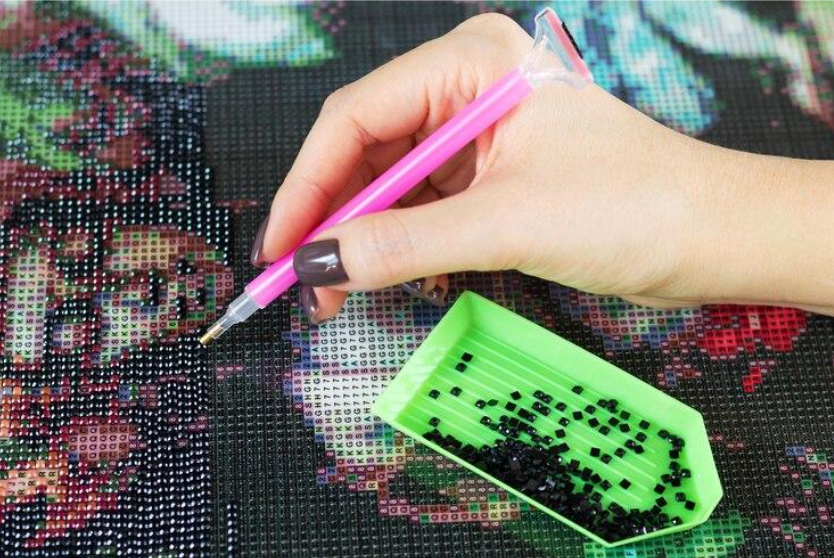
- Applicator Tools | Usually a stylus pen, wax pad, and sorting tray. If the pen tip is misaligned or the wax is too soft, placing drills becomes frustrating fast.
Diamond Painting Kits rely on material quality. It’s not just about sparkle, it’s about precision, durability, and ease. When the components are right, the craft feels effortless. When they’re not, you’ll feel it with every misplaced drill.
Design Phase | From Digital Art to Drill Map
Every Diamond Painting Kit begins with a digital image. But turning that image into a workable canvas is not as simple as uploading a file and printing it. The process is technical, layered, and surprisingly creative.
It starts with pixel mapping. Software breaks the image into a grid, where each square represents a drill placement. If the resolution mapping is off, the final result looks blurry or distorted. Too much detail, and the canvas becomes overwhelming. Too little, and the artwork loses its impact. Then comes color calibration. Each pixel is matched to a specific drill shade using DMC coding, a standardized system borrowed from embroidery. This ensures consistency across Diamond Painting Kits and makes it easier to replace missing drills. But it is not just about matching colors. Designers also consider how light interacts with the drills, how shadows fall, and which tones will pop once placed.
Next is symbol charting. Every drill color gets a unique symbol printed on the canvas. If the symbols are too similar or poorly spaced, it slows everything down. You’ll squint, second-guess, and misplace drills.
Finally, there is drill shape selection. Round drills are easier to place. Square drills give a tighter finish. Some Diamond Painting Kits use both, depending on the texture and complexity of the design. This phase is where the art becomes a blueprint. And when it is done right, you feel it with every drill you place. Diamond Painting Kits are not just printed; they are engineered.
Drill Manufacturing | How the Sparkle Is Engineered?
The sparkle in Diamond Painting Kits is not just visual, it’s engineered through a series of precise steps. Each resin drill goes through a controlled process to ensure it reflects light, holds its shape, and fits perfectly on the canvas. When this process is off, you’ll notice it immediately. Drills won’t align, colors will clash, and the final piece loses its impact. Here’s how the drills are made:
Step 1 | Resin Molding
Liquid resin is poured into precision molds. These molds shape each drill with multiple facets, typically 13 for round drills and up to 26 for square ones. If the mold is worn or misaligned, drills come out with flat edges or air bubbles, which ruin the overall finish.
Step 2 | Dyeing and Pigment Control
Pigments are added to the resin before curing. This step is critical. Even a slight imbalance can shift the color tone. Manufacturers use calibrated dye systems to maintain consistency across batches. Some test samples were under different lighting to catch subtle variations.
Step 3 | Faceting and Polishing
Once cured, drills are tumbled and polished to enhance reflectivity. This is where the sparkle is formed. If the surface is not clean or the shape is off, the drill won’t reflect light properly.
Step 4 | Quality Control
Factories use automated scanners to check for defects, wrong size, dull finish,and off-color. In smaller workshops, artisans still sort drills by hand. The best Diamond Painting Kits include extra drills to account for any imperfections.
Diamond Painting Kits depend on this precision. When the drills are consistent, every placement feels smooth. When they’re not, the entire canvas suffers. That’s why the manufacturing process matters more than most crafters realize.
Canvas Production | Adhesive Science and Print Precision
Canvas production is where Custom Diamond Painting Kits either succeed quietly or fail loudly. If the canvas is off misprinted, poorly glued, or too sensitive to climate, you’ll feel it with every drill you place.
Step 1 | Printing the Grid
The canvas starts as a blank polyester sheet. Industrial printers apply the symbol chart using UV-stable ink, which cures instantly under ultraviolet light. This prevents smudging and fading. If the ink bleeds or symbols blur, you’ll spend more time guessing than crafting. Precision matters here. The grid must align perfectly with the drill size, or the final image warps.
Step 2 | Adhesive Layering
Next comes the glue. High-quality Diamond Painting Kits use pressure-sensitive adhesive, poured in a smooth layer across the canvas. This adhesive reacts to light pressure, holding drills firmly without needing heat or moisture. But it’s sensitive. In humid or hot environments, the glue can soften too much or lose tackiness. In dry, cold conditions, it may become brittle. Manufacturers often test adhesive performance under different temperatures to avoid these issues.
Step 3 | Protective Film Application
A clear film is applied to protect the adhesive until you’re ready to work. If the film is too thin, it tears easily. Too thick, and it’s hard to peel without lifting the glue. Some Diamond Painting Kits use release paper instead, which offers better protection but requires careful handling.
Canvas production is not just printing, it’s chemistry, calibration, and climate control. When done right, the canvas feels effortless. When it’s wrong, you’ll fight it from the first drill to the last.
Packaging and Kit Assembly | Where It All Comes Together
Diamond Painting Kits may look neat and compact when they arrive, but the process of assembling them is anything but simple. It’s a mix of automation, manual checks, and customization that turns raw materials into a ready-to-use creative experience.
Step 1 | Sorting and Labeling Drills: Each drill color is packed into individual plastic bags, labeled with either a symbol, a DMC code, or both. In high-volume production, automated machines count and seal the drills, but human inspectors often double-check for accuracy. Most Diamond Painting Kits include 10 to 20 percent extra drills to account for loss, static cling, or manufacturing defects. If the labeling is off or the quantity is short, the entire crafting process becomes frustrating.
Step 2 | Tool Selection and Placement: Standard kits include a stylus pen, wax pad, and sorting tray. These are packed in separate compartments or sleeves to prevent damage. Some Diamond Painting Kits offer upgraded tools, multi-placer tips, ergonomic pens, tweezers, or even storage boxes. The quality of these tools matters. A misaligned pen tip or soft wax can slow down your workflow and affect drill placement.
Step 3 | Instruction Sheet Folding: A printed guide is folded and inserted into the kit. It explains how to read the symbol chart, how to use the tools, and offers basic tips. Some kits include QR codes linking to video tutorials or digital guides. If the instructions are vague or poorly translated, beginners struggle and may abandon the project halfway.
Step 4 | Canvas Rolling or Folding: Depending on the packaging style, canvases are either rolled around foam cores or folded flat. Rolling helps prevent creases, but takes up more space. Folding is compact, but risks grid misalignment if not done carefully. Some manufacturers add a protective cardboard sleeve to keep the canvas from bending during transit.
Step 5 | Final Assembly and Boxing: Once all components are verified, the kit is boxed. High-end Diamond Painting Kits use reinforced boxes with foam padding or shrink wrap. Budget kits may use thin cardboard or plastic sleeves. The packaging must protect against moisture, impact, and temperature changes during shipping. Some kits include silica gel packets to absorb humidity.
Step 6 | Market-Specific Adjustments: While the core components stay the same, Diamond Painting Kits are often customized based on audience preferences. This includes artwork themes, language-specific instructions, tool upgrades, and packaging aesthetics. Some kits are designed for beginners with simplified charts, while others target experienced crafters with complex designs and premium accessories.
Packaging is not just about putting things in a box. It’s about making sure everything arrives intact, usable, and inspiring. When done right, the kit feels like a complete experience. When rushed, it feels like a pile of parts. Diamond Painting Kits are curated, not just assembled.
Quality Control and Shipping | Getting It to Your Door
Before Diamond Painting Kits leave the factory, they go through a final round of inspection. It’s not just a glance, it’s a layered process that checks for missing drills, misprinted canvases, and tool defects. Each kit is weighed to confirm all components are included. If the numbers are off, it’s flagged for repacking.
Packaging durability matters. Kits are boxed to withstand long-distance shipping, often padded with foam or shrink-wrapped to protect against moisture and impact. Some manufacturers include silica gel packets to absorb humidity during transit. If the canvas is folded, it’s checked for creases that could affect grid alignment. Rolled canvases are inspected for edge curling and ink smudging.
Diamond Painting Kits are shipped globally, often from multiple production hubs. Delivery timelines vary depending on customs clearance, carrier speed, and seasonal backlogs. Some orders arrive in separate packages, especially when kits are sourced from different facilities. Tracking numbers are assigned to each parcel, and delays can occur when shipments move between countries or sit in port.
Shipping is part logistics, part patience. When it works smoothly, your kit arrives intact and ready to sparkle. When it doesn’t, it’s usually a packaging or customs issue not the product itself. Pricing is an estimated cost; for the exact cost, contact the vendor.
Every Sparkle Has a Story
Diamond Painting Kits are more than just a hobby, they’re a quiet collaboration between design, engineering, and human effort. Every drill you place has already passed through software mapping, resin molding, adhesive layering, and careful packing. What feels like a relaxing craft is actually the final step in a long, precise process.
You’re not just filling in a canvas. You’re finishing what dozens of hands and machines started. The grid you follow was calibrated pixel by pixel. The drills were dyed, faceted, and sorted with care. Even the tools were chosen to make your experience smoother.
It’s easy to overlook all that. But once you know the story, the sparkle feels different. It’s not just shine it’s intention. Share your favorite Diamond Painting Kit or a behind-the-scenes detail you’ve noticed. Maybe it was a perfectly printed canvas, or a drill color that caught the light just right. Every kit has its own story. What’s yours?